

Request a Demo
Join a 30 minute demo with a Cloudian expert.
Kubernetes multi-tenancy is the ability to run workloads belonging to different entities, in such a way that each entity’s workloads are segregated from the others. It is becoming an important topic as more organizations use Kubernetes on a larger scale.
Technically, multi-tenant Kubernetes means that the same cluster and control plane are shared by multiple entities or users.
Kubernetes is not a multi-tenant system out of the box. While it is possible to configure multi-tenancy, this can be challenging. It is relatively easier to achieve soft multi tenancy in Kubernetes, in which workloads are separated, but it is still possible to access one tenant from another—this is suitable for trusted tenants, such as different departments in the same organization.
This is part of our series of articles on Kubernetes storage.
In this article, you will learn:
Soft multi-tenancy involves separating a Kubernetes cluster among several users or workloads, without strict isolation. This is suitable for trusted tenants—the main use case is several projects or departments running workloads in the same organization. In these scenarios, the intention of multi-tenancy is to prevent accidental access and assist with separation of resources. It cannot prevent willful attacks or abuse carried out by one tenant against the other.
Soft multi-tenancy can be achieved using Kubernetes namespaces, where each namespace represents a tenant.
Hard multi-tenancy enforces stricter tenant isolation, preventing any negative impact from another tenant, including malicious behavior. This model allows for untrusted tenants, such as serving infrastructure to many different organizations.
Implementing hard multi-tenancy in Kubernetes requires a more complex namespace or virtual cluster (vClusters) configuration.
For most use cases, hard multi-tenancy is preferred because it can support both trusted and untrusted tenants. However, many believe Kubernetes cannot support true hard multi-tenant capabilities, because all tenants share the same central control plane. In reality, Kubernetes can support hard multi-tenancy, but it is more difficult to set up. This also raises the risk of misconfiguration, which can lead to tenants not being fully isolated.
Here are a few ways Kubernetes with a single tenant differs from multi-tenant Kubernetes.
With single tenancy, you’ll have to maintain a separate cluster for each user or entity. Each cluster has its own management components—master nodes, control plane, monitoring, and so on. These components require additional resources, so single tenancy costs more per tenant.
With multi-tenancy, because you can share a cluster between several tenants, there are less overhead costs for cluster management components, and so lower costs. You can reuse any cluster-wide resource, including etcd, Ingress controller, and load balancing.
With single tenancy, security is easy to achieve because there is natural isolation between workloads. This is obviously the most secure model when there are untrusted tenants—for example, several customers, each of which is a separate organization.
With multi-tenancy, applications and workloads share the same cluster resources, raising the risk of attacks or abuse between tenants. You can use Kubernetes security features such as Role Based Access Control (RBAC) to ensure each tenant only has access to their specific resources.
With single tenancy, you only need to set up and manage one Kubernetes cluster for each tenant. Kubernetes deployment is complex and time consuming. However, you can automate the process or rely on a managed Kubernetes service like Amazon Elastic Kubernetes Service (EKS) or Google Kubernetes Engine (GKE).
With multi-tenancy, there is less overhead and complexity, because you can set up one Kubernetes cluster for several tenants.
Here are a few best practices that will help you implement multi-tenancy more effectively in your Kubernetes environment.
Assign each tenant a separate namespace to create soft multi-tenancy. Adding namespaces is easy—it can be done with the kubectl create namespace command.
Keep in mind that namespaces on their own do not provide strong isolation between tenants. To create stricter isolation you will have to define security policies and access restrictions.
In some cases you may want to provide several namespaces to one tenant—for example, if the same customer has several teams working in the Kubernetes cluster, each of which needs a separate working environment.
Resource Quotas define how many resources each tenant is allowed to access. You can define how much CPU capacity, memory and storage can be used by all pods in a namespace.
Here is an example of a Resource Quota file that grants the containers within a specific namespace 5 CPU requests and 10 total CPUs. You can apply the policy to a namespace using the kubectl apply command.
apiVersion: v1
kind: ResourceQuota
metadata:
   name: tenant1
spec:
   hard:
      requests.cpu: "5"
      limits.cpu: "10"
You can use Role-based Access Control (RBAC) to control which tenant has access to which resources. It is useful to have at least the following roles:
Each role should have the minimal permissions they need to perform their job. You can define permissions to create, modify, update and delete (CRUD) for the entire cluster, namespaces, pods, and containers.
Ensure that the host operating system for both master and worker nodes is secure. If an attacker is able to compromise a node, they can take control of containers running on that node. In general, you should avoid giving root access on any node to ordinary users or even to tenant admins.
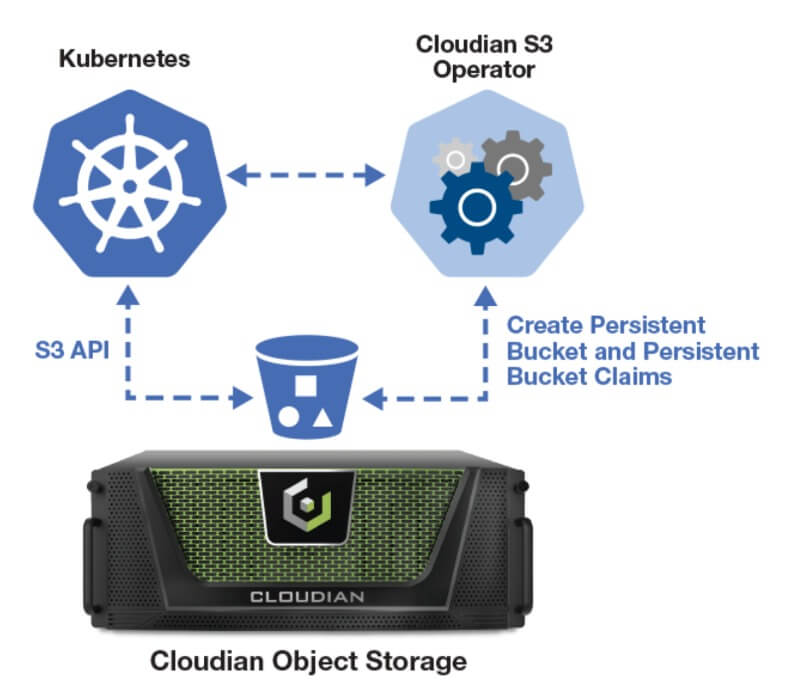
Containerized applications require storage that’s agile and scalable. The Cloudian Kubernetes S3 Operator lets you access exabyte-scalable Cloudian storage from your Kubernetes-based applications. Built on the S3 API, Cloudian lets you dynamically or statically provision object storage with this lightweight Operator using S3 APIs. You get cloud-like storage access in your own data center.
Cloudian’s key features for Kubernetes storage include: