AWS CLI with S3-Compatible Storage

There’ve been a lot of discussions about Amazon’s Simple Storage Service (S3) and Amazon Web Services (AWS). It seems to me that everyone is saying that they are Amazon S3-compatible or that they work with S3 storage. That makes me wonder, what is the best way to validate a solution or test it out to see if the storage solution will meet my object storage needs? Well, why not just use Amazon’s own S3APIs and AWS Command Line Interface (CLI)?

AWS CLI is a unified tool developed to help manage AWS services. I believe this is the best way to test out any solution that says they are an S3 compatible storage such as Cloudian HyperStore. So let’s hop on to it and get started. The following shows the steps on how to install and use AWS CLI with Cloudian HyperStore on your Linux server.

Prerequisite:

You will need to install PIP to simplify your AWS CLI installation, you can copy the following python script to your Linux server and it will help you install pip and awscli. The script is provided as-is but feel free to copy, modify and improve it to your liking.

import urllib

import os

PIP=’get-pip.py’

urllib.urlretrieve (“https://bootstrap.pypa.io/get-pip.py”, PIP)

os.system(“python get-pip.py”)

os.system(“pwd”)

os.system(“pip install awscli”)

Process:

  1. Download the following dc_getpip.py to your Linux server. The script has been tested on RHEL and CentOS. The Cloudian S3 region used in this example is s3-region.addomain.local
  2. Run python dc_getpip.py. This script will download pip and install AWS CLI for you.
  3. When the AWS CLI is successfully installed, continue with configuring AWS CLI with Cloudian HyperStore.
  4. Execute aws configure and provide the Cloudian credential along with the Cloudian S3 region information. For example:
  5. cd ~/./.aws because the config and the credential files for aws is located in your user directory. In this example, this is the root user directory.AWS CLI root user directory
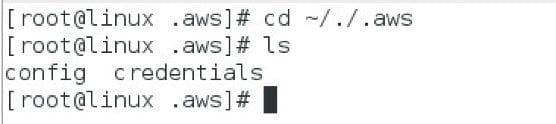
  6. There are 2 files in .aws directory:
    1. config
    2. credentials
  7. Update the config file with the Cloudian region information. Include [cloudian] in your update.AWS CLI Cloudian regional information
  8. Update the credentials files with the Cloudian information, include [cloudian] in your update.AWS CLI credentials file
  9. Run the following aws command to validate connectivity to your Cloudian HyperStore cluster. Using s3 ls will list the buckets of the tenant that was configured.
    1. aws –profile=cloudian –endpoint-url=http://s3-region1.addomain.local s3 lsAWS CLI validate connectivity to Cloudian HyperStore cluster
    2. Replace s3-region1.addomain.local with your Cloudian region.
    3. You can use aws –profile=cloudian –endpoint-url=http://s3-region1.addomain.local s3 cp file s3://bucket to test upload to your s3 bucket.
  10. Your AWS CLI is successfully configured with Cloudian HyperStore S3.


If you are curious to learn more about S3, download Cloudian HyperStore’s community edition and validate the solution for yourself.

Learn more about hybrid cloud management here.

IBM Spectrum Protect with Amazon S3 Cloud Storage

IBM Spectrum Protect (formerly IBM Tivoli Storage Manager) solution provides the following benefits:

  • Supports software-defined storage environments
  • Supports cloud data protection
  • Easily integrates with VMware and Hyper-V
  • Enables data protection by minimizing data loss with frequent snapshots, replication, and DR management
  • Reduce the cost of data protection with built-in efficiencies such as source-side and target-side deduplication

IBM Spectrum Protect has also enhanced its offerings by providing support for Amazon S3 cloud storage (version 7.1.6 and later) and IBM Spectrum Protect version 7.1.6 was just released on June 17th, 2016. I was actually a little nervous and excited at the same time. Why? Because Cloudian HyperStore has a S3 guarantee. What better way to validate that guarantee than by trying a plug-and-play with a solution that has just implemented support for Amazon S3?

Overview of IBM Spectrum Protect with Amazon S3 cloud storage

And the verdict? Cloudian HyperStore configured as “Cloud type: Amazon S3” works right off the bat with IBM Spectrum Protect. You can choose to add a cloud storage pool from the V7.1.6 Operations Center UI or use the Command Builder. The choice is yours.

We’ll look at both the V7.1.6 Operations Center UI and the Command Builder to add our off-premise cloud storage.

NOTE: Cloudian HyperStore can be deployed as your on-premise S3 cloud storage but it has to be identified as an Amazon S3 off-premise cloud storage and you have to use a signed SSL certificate.

Here’s how you can add an Amazon S3 cloud storage or a Cloudian HyperStore S3 cloud storage into your IBM Spectrum Protect storage pool:

From the V7.1.6 Operations Center UI


From the V7.1.6 Operations Center console, select “+Storage Pool”.

Adding 'Storage Pool' to the IBM Spectrum Protect V7.1.6 Operations Center console

In the “Add Storage Pool:Identity” pop-up window, provide the name of your cloud storage and the description. In the next step of the “Add Storage Pool:Type”, select “Container-based storage:Off-premises cloud”.

IBM Spectrum Protect cloud storage description

Click on “Next” to continue. The next step in the “Add Storage Pool:Credentials” page is where it gets exciting. This is where we provide the information for:

  • Cloud type: Amazon S3 (Amazon S3 cloud type is also used to identify a Cloudian HyperStore S3)
  • User Name: YourS3AccessKey
  • Password: YourS3SecretKey
  • Region: Specify your Amazon S3 region (for Cloudian HyperStore S3, select “Other”)
  • URL: If you had selected an Amazon S3 region, this will dynamically update to the Amazon region’s URL. If you are using a Cloudian HyperStore S3 cloud storage, input the S3 Endpoint Access (HTTPS).

Complete the process by clicking on “Add Storage Pool”.

IBM Spectrum Protect

NOTE: Be aware that there is currently no validation performed to verify your entries when you click on “Add Storage Pool”. Your S3 cloud storage pool will be created. I believe the IBM Spectrum Protect group is addressing this with a validation process for the creation of a S3 cloud storage pool. I hope the step-by-step process that I have provided will help minimize errors with your Amazon S3 cloud storage pool setup.

From the V7.1.6 Operations Center Command Builder


From the V7.1.6 Operations Center Command Builder, you can use the following define stgpool command and you are done adding your off-premise S3 cloud storage pool:

  • define stgpool YourCloudName stgtype=cloud pooltype=primary cloudtype=s3 cloudurl=https://s3.cloudianstorage.com:443 access=readwrite encrypt=yes identity=YourS3AccessKey password=YourS3SecretKey description=”Cloudian”

NOTE: You can review the server instance dsmffdc log if there’s errors. It is located in the server instance directory. There’s also a probability that the signed SSL certificate might not be correct.

For example:

06-20-2016 11:58:26.150][ FFDC_GENERAL_SERVER_ERROR ]: (sdcloud.c:3145) com.tivoli.dsm.cloud.api.ProviderS3 handleException com.amazonaws.AmazonClientException Unable to execute HTTP request: com.ibm.jsse2.util.h: PKIX path building failed: java.security.cert.CertPathBuilderException: unable to find valid certification path to requested target
[06-20-2016 11:58:26.150][ FFDC_GENERAL_SERVER_ERROR ]: (sdcntr.c:8166) Error 2903 creating container ibmsp.a79378e1333211e6984b000c2967bf98/1-a79378e1333211e6984b000c2967bf98
[06-20-2016 11:58:26.150][ FFDC_GENERAL_SERVER_ERROR ]: (sdio.c:1956) Did not get cloud container. rc = 2903


Importing A Signed SSL Certificate


You can use the IBM Spectrum Protect keytool –import command to import the signed SSL certificate. However, before you perform the keytool import process, make a copy of the original Java cacerts.

The Java cacerts is located in IBM_Spectrum_Protect_Install_Path > TSM > jre > security directory.

You can run the command from IBM_Spectrum_Protect_Install_Path > TSM > jre > bin directory.
For example, on Windows:

    • ./keytool –import ../lib/security/cacerts –alias Cloudian –file c:/locationofmysignedsslcert/admin.crt


Enter the keystore password when prompted. If you haven’t updated your keystore password, the default is changeit and you should change it for production environments. When you are prompted to “Trust this certificate?”, input “yes”.

NOTE: Keep track of the “Valid from: xxxxxx” of your signed SSL certificate, you will have to import a new certificate when the current one expires.

By the way, if you encounter error “ANR3704E sdcloud.c(1636): Unable to load the jvm for the cloud storage pool on Windows 2012R2”, update the PATH environment variable on the Spectrum Protect Server:
IBM_Spectrum_Install_Path\Tivoli\TSM\jre\bin\j9vm and also set the JVM_LIB to jvm.dll.

Here’s what your Amazon S3 cloud storage type looks like from IBM Spectrum Protect V7.1.6 Operations Center console:

Operations Center console final result after adding Amazon S3 cloud storage to IBM Spectrum Protect V7.1.6

And you’re off! If you encounter any issues during this process, feel free to reach out to our support team.

You can also learn more by downloading our solution brief.

How-To: S3 Your Data Center

As the Storage Administrator or a Data Protection Specialist in your data center, you are likely looking for some alternative storage solution to help store all your big data growth needs. And with all that’s been reported by Amazon (stellar growth, strong quarterly earnings report), I am pretty sure their Simple Storage Service (S3) is on your radar. S3 is a secure, highly durable and highly scalable cloud storage solution that is also very robust. Here’s an API view of what you can do with S3:

S3 API view

As a user or developer, you can securely manage and access your bucket and your data, anytime and anywhere in the world where you have web access. As a storage administrator, you can easily manage and provision storage to any group and any user on always-on, highly scalable cloud storage. So if you are convinced that you want to explore S3 as a cloud storage solution, Cloudian HyperStore should be on your radar as well. I believe a solution that is easy to deploy and use helps accelerates the adoption of the technology. Here’s what you will need to deploy your own cloud storage solution:

  • Cloudian’s HyperStore Software – Free Community Edition
  • Recommended minimum hardware configuration
    • Intel-compatible hardware
    • Processor: 1 CPU, 8 cores, 2.4GHz
    • Memory: 32GB
    • Disk: 12 x 2TB HDD, 2 x 250GB HDD (12 drives for data, 2 drives for OS/Metadata)
    • RAID: RAID-1 recommended for the OS/Metadata, JBOD for the Data Drives
    • Network: 1x1GbE Port


You can install a single Cloudian HyperStore node for non-production purposes, but it is best practice to deploy a minimum 3-node HyperStore cluster so that you can use logical storage policies (replication and erasure coding) to ensure your S3 cloud storage is highly available in your production cluster. It is also recommended to use physical servers for production environments.

Here are the steps to set up a 3-node Cloudian HyperStore S3 Cluster:

  1. Use the Cloudian HyperStore Community Edition ISO for OS installation on all 3 nodes. This will install CentOS 6.7 on your new servers.
  2. Log on to your servers
    1. The default root password is password (Update your root access for production environments)
  3. Under /root, there are 2 Cloudian directories:
    1. CloudianTools
      1. configure_appliance.sh allows you to perform the following tasks:
        1. Change the default root password
        2. Change time zone
        3. Configure network
        4. Format and mount available disks for Cloudian S3 data storage
          1. Available disks that were automatically formatted and mounted during the ISO install for S3 storage will look similar to the following /cloudian1 mount:
            Format and mount available disks for Cloudian S3 data storage
    2. CloudianPackages
      1. Run ./CloudianHyperStore-6.0.1.2.bin cloudian_xxxxxxxxxxxx.lic to extract the package content from one of your nodes. This will be the Puppet master node.
        S3 Puppet master mode
      2. Copy sample-survey.csv survey.csv
        sample-survey.csv
      3. Edit the survey.csv file
        Edit survey.csv
        In the survey.csv file, specify the region, the node name(s), IP address(s), DC, and RAC of your Cloudian HyperStore S3 Cluster.

        NOTE: You can specify an additional NIC on your x86 servers for internal cluster communication.

      4. Run ./cloudianInstall.sh and select “Install Cloudian HyperStore”. When prompted, input the survey.csv file name. Continue with the setup.
        NOTE: If deploying in a non-production environment, it is possible that your servers (virtual/physical) may not have the minimum resources or a DNS server. You can run your install with ./cloudianInstall.sh dnsmasq force. Cloudian HyperStore includes an open source domain resolution utility to resolve all HyperStore service endpoints.
      5. v. In the following screenshot, the information that we had provided in the survey.csv file is used in the Cloudian HyperStore cluster configuration. In this non-production setup, I am also using a DNS server for domain name resolution with my virtual environment.Cloudian HyperStore cluster configuration
      6. Your Cloudian HyperStore S3 Cloud Storage is now up and running.
        Cloudian HyperStore S3 cloud storage
      7. Access your Cloudian Management Console. The default System Admin group user ID is admin and the default password is public.
        Cloudian Management Console
      8. Complete the Storage Policies, Group, and SMTP settings.
        Cloudian HyperStore - near final

Congratulations! You have successfully deployed a 3-node Cloudian HyperStore S3 Cluster.